UE4/5 Build Agents for Jenkins
Build UE4 build agents for Jenkins with Bare metal or Azure
This is a quick overview on how to prepare a Windows pc to be used as a Jenkins agent. Currently my setup is utilizing Azure VM’s as agents using the Azure VM Agent jenkins Plugin. I’ll run you through setting up a windows ue4 build agent with two scenarios
Scenarion 1 - Barebones PC
This is how I originally set up my agents. I used a Virtual machine on my main pc and set up two windows vm’s on it. Another solution would jsut be to take a spare pc and set it up as a jenkins build agent.
- Install Visual Studio 2019 Community Edition and check off the options for Game Development with C++ and Unreal Engine.
- Copy your engine source over to the machine. If you are just doing client builds, you can install the epic launcher and have the engine be installed that way. If you need a source install for server builds, I would recommend making an Installed Build.
- Once you have the engine installed, just verify it opens. The editor executable can be found at
Engine\Binaries\Win64\UE4Editor.exeorEngine\Binaries\Win64\UnrealEditor.exefor UE5. - The next step is to setup up Jenkins prereqs. You’ll want to install JNLP to connect to Jenkins which needs Java. This following snippet installs Chocolatey which is a Windows package manager and then it installs a Java runtime. You can install your preferred Java runtime directly if you do not want to use chocolatey
Set-ExecutionPolicy Bypass -Scope Process -Force; [System.Net.ServicePointManager]::SecurityProtocol = [System.Net.ServicePointManager]::SecurityProtocol -bor 3072; iex ((New-Object System.Net.WebClient).DownloadString('https://chocolatey.org/install.ps1'))

choco install -y adoptopenjdk11

$env:Path = [System.Environment]::GetEnvironmentVariable("Path","Machine") + ";" + [System.Environment]::GetEnvironmentVariable("Path","User")

java -version
If this works correctly, it should spit out the current java version at the end
- Once this is done, you need to log into the Jenkins master from the computer that you want to be the agent.
Manage Jenkins -> Manage Nodes and Clouds -> New Node -> Enter Nodes Name -> Click Permentant Agent -> Click OK
-
Fill out the details on this page. I personally like to set my executors to 1 for my UnrealEngine agents just because you can’t have multiple AutomationTool commands running at the same time. I also put a label named UnrealEngine so only builds that need the engine will be using this agent. For the launch method, click the dropdown and select Launch agent by connecting it to the master. Hit save and there will be a new button on the next screen to download the JNLP jar.
-
Install the Jar from step 6 and the agent should not be up and running. Give it a few minutes and it should connect to Jenkins.
If it doesn’t work right away there most likely might be a port thats being blocked on your Jenkins master. I had to open port 50000 in order to make it work
Scenario 2 - Azure VM Agent
This setup is my preferred way to do things. You can infinitely scale vm agents and shut them down at a moments notice. This setup will walk you through using the Azure VM Agent plugin on Jenkins that will allow you to spin agents up and down as they are needed.
- You’re going to need to setup a new VM on Azure to use as a baseline to create an image. I also used NV4as_V4 vm’s with AMD cards. The pricing was right for me and these SKU’s seem like they are meant for more generalized work than the other SKU’s that have graphics cards. Pick Windows 10 Enterprise for your OS and then create your vm.
- Follow steps 1-3 from Scenario 1
- You should have the engine now installed on your VM. Now its time to create an image. Open a cmd prompt and type in the following command.
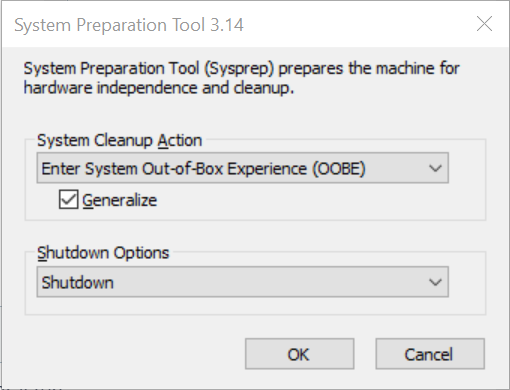
%windir%\System32\Sysprep\sysprep.exeThis command will open sysprep. Sysprep is a Windows tool that assists with generalizing a windows installation prior to creating an image. This generalization will remove all personal settings from the image.
-
Input these options into sysprep and hit enter. Your vm should shutdown after its done.
-
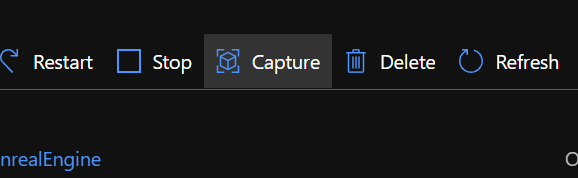
In about 5 minutes, go back to the vm’s page. Double check that its off and once it is hit “Capture”

- Inside of the capture screen, change the following setting. Due to the Unreal EULA you sign, you can’t create a public image of your VM with the engine source on it. You can create a gallery image if you were using the binary version of Unreal, but I won’t go over that since thats much more complicated

-
Once thats done you will have your image. You can quickly check to see if it works by going to Azure Portal -> Images -> your image name -> create vm. We don’t need to do that here. I also recommend that once you are done setting things up, delete all your vm resources. The image is its own resource so you can delete everything including the disk for the source vm that created the image. On the top right of the VM image page in the Azure Portal, there should be a button named “JSON View”. Click that button and jot down the “Resource Id” of the image
-
Now we are back to Jenkins. Install the following plugin Azure VM Agents
-
Lets set up a new node. Jenkins -> Manage Jenkins -> Nodes and Clouds -> Configure Clouds. On this page hit Add new Cloud. The name can be whatever you want. A lot of these settings are self explanatory or have help buttons. I will review the Image Configuration setting since this one can be tricky
Image Configuration
-
Make sure you are using the Use Advanced Configuration button.
-
The Image type is Custom User Image
-
Image Id is the Resource Id that we saved from step 7
-
Os Type Windows
-
Launch Method SSH
-
Check the pre install SSH button
-
VM First Startup Configuration -> This is a script that you can use to install programs or setup the OS once the image is done installing. Since my Unreal Image is used only for building Unreal Projects, I set everything up in the image itself. This section is really useful if you wanted to use the same image for different project that require the core image to be altered a bit
-
Test, Test, Test and more Tests! You should be all set now and should be able to use your image. For Windows 10 images it takes me about 7 minutes for Azure to provision my Unreal Engine image.

